Tuesday 28 February 2012

Wall Flower

It's finished!!! Once again I have to thank Lucy at  http://attic24.typepad.com/  for her wonderfully clear tutorial so that even beginners like me can make Stuff-That-Looks-Really-Complicated!


This first version is destined to live at the Country House and later this week I plan to start another for the Week Day Home.  It didn't take too long to make once I got going and the really fun part was stringing it all together and deciding which beads to use.  Let me know if you have a go at making one too :) 


Sunday 26 February 2012

A Woolly Weekend

Birthday weekends are always special and our tradition is that the person whose birthday it is, gets to choose the weekend's activities. So if I say we have spent time (and money) at the splendid Get Knitted shop in Bristol and spent the rest of the day working on the attic24 flower wall hanging, you'll realise this wasn't a small person's birthday! The boys both small and tall didn't mind too much because happily, my yarn shop is round the corner from the motorbike shop. Or had they worked that out in advance...?
Having time off from grown up duties was a gift in itself as I settled down in the big corner chair for the whole afternoon with a basket full of new colours to play with. Himself got the wood burner blazing, cooked dinner for us and all was bliss in the Country House.
And the result of all that happy hooking is an attic24 flower wall decoration! Only the putting-it-together bit to go :)
Before I can finish the flower there's running to be done. We're all in training for our different races coming up in the spring. Two miles for Second Born, 4 miles for me and a half marathon for Himself.

And spring is just around the corner :)


Wednesday 22 February 2012

Quilting Woes

What do you do when you fall out of love with a project?  My first two quilts were a real pleasure to make at each stage but my current quilt has taken forever and it's still not finished.  I think the problem is that I just don't love it any more.  That's not the quilt's fault of course, I've just developed a bad attitude to it and haven't done any homework on it since my last sewing class.  (Can you sense the Grumpiness?)  

I had experimented with union jacks before in a smaller size but scaling that up even to a smallish sized quilt has been a head scratching exercise!  Perhaps the process of adding the quilting will be soothing and I'll get my mojo back again.  Or perhaps I'll allow myself to get a little bit distracted by a cute bottle I've just washed up....


Yup, a bit of lace left over from something else, some beads, a bit of green yarn to string through the top border and some cheery daffodils to make it look like spring has arrived in the Week Day Home.


Simple, but jolly!


Tuesday 21 February 2012

The Cooking of Cookies

Our weekends have recently seen more kitchen action than normal.  Himself's First Born has an interest in baking which we encourage in the hope that one day the results will be edible.  And this weekend our faith was rewarded!  The boys worked well together with the Second Born reading out the recipe and the First Born in charge of measuring, weighing and mixing.    We were required to supervise hot oven stuff but otherwise it was all their own work.  And tasted really rather wonderful!!


Friday 17 February 2012

Polymer Clay Crochet Hook Tutorial

I've been spending some time playing with my new blog which means I've seen a lot of my yoga cows on the banner heading at the top there.  I've also been doing a lot of crochet, working on my 6 Ball Blanket.   So it seemed completely obvious that I should link those thoughts and make myself a cow crochet hook.  Have you ever used fimo?  Also known as polymer clay, you buy it in different colours and mould it, shape it and bake it at a low temperature in the oven for about 20 mins until it hardens.  Brilliant!

This is what you need - a crochet hook (made of metal), and some white and black fimo.  Soften the fimo in your hands to get it pliable and roll a ball of each colour.

Roll the white ball into a stumpy sausage shape and push the end of the crochet hook into it but don't let it pop out of the end.  Then roll it out until the white fimo covers half the hook.  Roll tiny balls of black fimo.

Use your finger tip to squish the tiny black balls flat and into irregular shapes (think cow thoughts) then press them gently onto the white  cover.

Your neat, smooth sausage shape cover will get distorted by this but don't worry, we'll sort that out once you've pressed all the black spots onto it.

Now roll the spotty cover until the black softens into the white clay and it's even all round.  Then run a knife around the edge half way down the hook to cut off the excess and make a neat edge.  You want to make sure you can see the size marked in the middle.  And you're done!  Bake according to the instructions on the pack.  If you like, you can sand it down and varnish. 

I got all giddy about my cow crochet hook so I found a Gustav Klimt inspired polymer clay cane I made ages ago and covered another hook with that.   Canes are like a stick of rock, they have a design which runs all the way through the middle.  To use a cane you cut thin slices from it.  The book I learned from is Donna Kato's "The Art of Polymer Clay Millefiori Techniques"  

Finished!

This has given me a yearning for yarn.....

Thursday 16 February 2012

January Mosaic


 I love seeing other people's mosaics and it's taken me till now to work out how to do it and get the photo layout right!  So, a little late, this was my January.  A trip to gorgeous Goa sandwiched between two of the coldest days of the month. 

Tuesday 14 February 2012

A string of hearts

Hearts are everywhere today but I like hearts all year round.  That's why there's a string of tiny stuffed hearts across the back of my bed. There are 16 hearts on the string which were very quick to make, about 2 evenings worth of cutting, sewing, turning and stuffing.  Once you have all your hearts, thread string directly through the back and ta dah...!   


By the way, the Goodnight Angel was from "Crafting Christmas Gifts" a book by one of my fav designers, Tone Finnanger aka Tilda.  I made several of her angels to give as presents and one extra for the Week Day Home :) There are stuffed hearts dangling from drawer knobs and a heart themed quilt with wobbly hearts quilted in the centre.


This was the first quilt I ever made under the patient and calm instruction of my lovely sewing teacher, Catherine of www.onefatquarter.co.uk.  Each week she inspires our small group as we design, sew, layer and chat.  When the big moment arrives and it's time to join the layers of top design, wadding and backing, we help each other by adding our stitches to tack the layers together. I like the continuity, knowing that for centuries women have gathered exactly as we do to sit and sew and offer opinions or advice about fabric, colour, patterns or life.  It's a once a week peaceful oasis :)


Monday 13 February 2012

Crystal Trees

Wow, did anyone else notice the Crystal Trees on Saturday?  I was driving to the Country House for the weekend in the midday sunshine when I was struck by how amazingly twinkly, shiney and sparkly the world looked. It was so spectacular I had to pull over and take some pics.  Every blade of grass, every branch and every twig was sealed in a solid ice sleeve.  It was beeeuuutiful!!


Saturday 11 February 2012

Brightly Cold


Ooooh, it's a chilly morning here but lovely to wake up to bright sunshine.  


How cold do those birds look??  This sort of weather is the perfect excuse for tucking up warm and cosy indoors and getting on with the 6 Ball Blanket.  And this is where I have to thank Lucy of  attic 24  http://attic24.typepad.com/  for all the wonderful inspiration on her blog.  I'd always been a bit intimidated by anything woolly until I found her site but her tutorials are so clear it removes The Fear.  

The 6 Ball Blanket below is from her Granny Stripe tutorial but without the stripes.  For my first attempt at crochet I wanted Simple!  It's treble stitch all the way and has been gradually growing at a rate of about 1 ball a month.  Now it's at a very satisfying stage because as I hook away, I can feel the weight and warmth of it on my knees.  Thanks Lucy :)

(The wool I've used is Rico Design Superba Bamboo)

Friday 10 February 2012

Little desk tidy

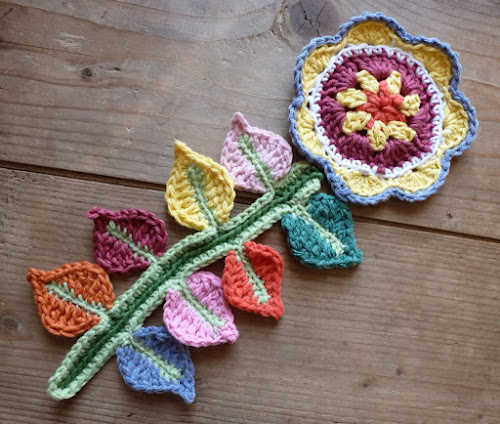
What to do with a scrunchy flower...
You know how it is when you're attempting to tidy up your crafting area and you get completely distracted by a gift tubey thing left over from a Christmas present?  And you don't want to chuck it because it Might Be Useful?  The tubey thing I found was made of card and just asking to have holes punched in it and scrunchy flowers inserted.  Push paper fasteners to secure  the flowers straight through the card, add some leaves and va  va voom - a little desk tidy.   Happy days :)

Tuesday 7 February 2012

Scrunchy Flower Tutorial

One of the things I most appreciate about other people's blogs is their generosity in sharing techniques and tutorials.  I'm going to show you how I make scrunchy flowers.

You'll need punches or a template to cut 3 different size circles, some coloured card, some paper fasteners, a water spray and glimmer mist (I used gold)
Cut or punch 3 different sized circles

Spritz with water, just enough to make the card damp and scrunch up.
Layer up with the biggest circle on the bottom.  Spritz with the gold glimmer mist and use the paper fastener to hold the three layers together.   

Sort of gather and scrunch up each layer around the fastener,  give it a squeeze and unfurl a little so the flower doesn't lie completely flat.  Ta dah !

For variation, rough up the outside rim of each circle (use a nail file or distressing tool) and add a punched out leaf.